How To - Installation Tutorials
One of the most important parts of the installation process is to first make sure you have all of the necessary tools to get started. For this project, you’ll need a:
- Stud finder
- Construction pencil
- Bubble level
- Saber saw or keyhole saw
- Speaker wire
- Phillips head screwdriver or cordless screwdriver
- Template for the wall cut out
In Ceiling Speakers
Step One
Take the stud finder and locate a center point in between the two joists and then mark that point with the construction pencil. Then, use the template to trace a hole pattern on the ceiling where the speaker will go.
Step Two
Once the pattern is drawn and you are satisfied with where the speaker is going to go you can start cutting. Start by taking a saber saw, keyhole saw or very sharp utility knife and carefully cut the wall following the traced pattern. Make sure to take special note of the wiring already present in the walls to avoid cutting it. Be careful not to be directly under where you are cutting to avoid getting debris in your eyes.
Step Three
Next, you have to wire the speakers. Speaker wire will need to be run through the ceiling from the location of your AV receiver. Depending on speaker placement, speaker wire may have to run through support beams above the ceiling and run using a cable snake. If you are not comfortable with this step, consult an installation professional. If the speaker wire is already run and you properly marked the location of the speaker, you should see the speaker wire hanging around the area where your hole is cut in the ceiling. WYou will need to trim back the jacket about three-quarters of an inch to expose the wire taking notice of its polarity. Now, place the positive end of the wire in the red speaker terminal and the negative end in the black speaker terminal.
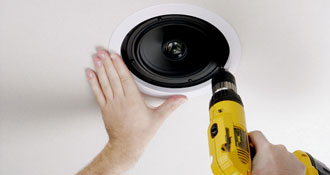
Step Four
Place the speaker back into the hole and use your Phillips head screwdriver to tighten the six mounting screws which will rotate the mounting wings or dog legs behind the mounting surface and hold the speaker in place. Be careful not to over tighten as it could cause damage to the drywall.
Step Five
Now is a good time to test to make sure the speaker is working. Turn on your stereo and make sure you're satisfied with the sound coming out of the speaker. Then install the grille by positioning one edge of the grille into the slot, then press and squeeze around the perimeter of the grille while pushing the leading edges into the slots.