Cookies help us deliver our services. By using our services, you agree to our use of cookies.
Learn more
X
Return to the library.
Car Amplifier Tuning and Features
You bought a new car audio amplifier for your subwoofers or speakers, and you want to get it installed ASAP. Power, ground and remote wires are connected. RCA’s are hooked up. Speaker wires are run from the amp to the subwoofers or speakers. Now what?
There are many settings on car amplifiers that you need to understand in order to properly set them. If you don’t correctly setup the amp, you may not get the best performance, or worse, you could damage your equipment.
Different car audio amplifiers will have different features. From brand to brand and model to model, amps may look slightly different and the terminology may vary a bit, but understanding the basics will let you properly optimize your system and be listening to great music quickly.
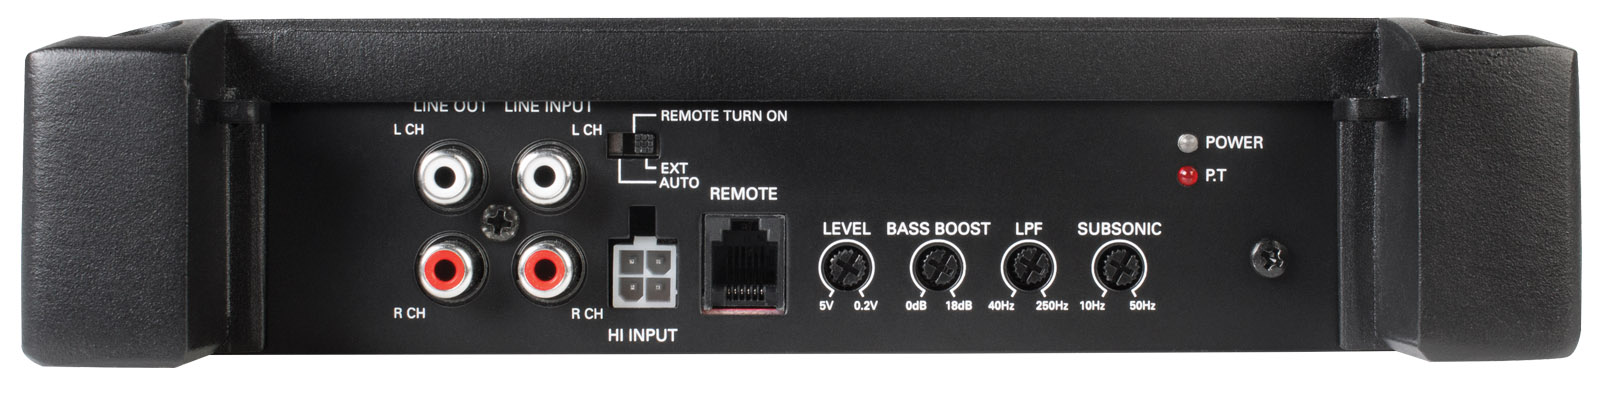
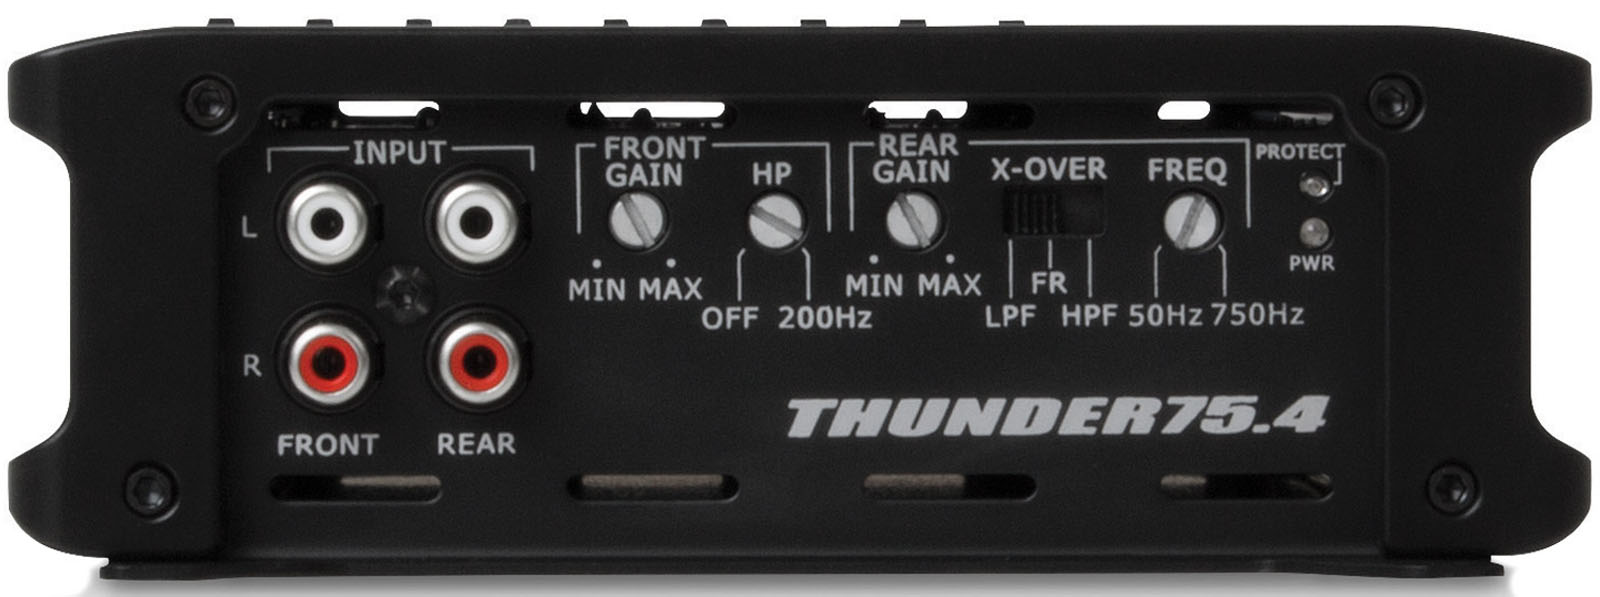
For example, a mono-block amplifier (shown above) will have a slightly different set of features than a multi-channel amplifier (shown below).
We are going to discuss most of the basic features that you will find on most amplifiers.
LEVEL or GAIN, is a setting that is used to match the output voltage of your head unit (radio, Bluetooth player, etc) to the output voltage of your amplifier. Some head units have more output voltage than others, so the LEVEL or GAIN setting on your amplifier allows you to match the output voltage of the amplifier to the signal it is receiving from your head unit. If your LEVEL or GAIN is set too high, you will be over amplifying the audio signal and sending a clipped, or distorted, signal to your subwoofers or speakers, which is potentially damaging and doesn't sound good. For more information on how to set your amplifier LEVEL or GAIN – CLICK HERE.
Since “mono-block” amplifiers have only one channel used to power subwoofers, there is only one LEVEL or GAIN dial to set. For multi-channel amplifiers designed to power one or more pair of left and right speakers, there are usually two or more LEVEL or GAIN settings. On the MTX THUNDER75.4 four-channel amplifier, shown above, there are separate LEVEL or GAIN settings for the FRONT and the REAR speakers.
If LEVEL or GAIN is used to level match the output voltage to the head unit, why do you need two settings? Good question… Using Ohm’s Law of V (voltage) = √P (amplifier RMS power rating) x R (resistance of speakers), you can see that if the impedance, or resistance, of the speakers on the front channels is different than the speakers on the rear channels, the gain adjustments will need to be different. This is why it is useful to have two LEVEL or GAIN settings for a multi-channel amplifier.
CROSSOVER (X-OVER), is a tuning setting that usually has predetermined frequency ranges depending on the setting you choose. For example, LPF (sometimes referred to as LP) refers to Low Pass Frequencies and is used for subwoofers designed to play only the lowest notes. HPF (sometimes referred to as HP) refers to High Pass Frequencies and is used for speakers and tweeters. FR = Full Range means the crossover is going to allow all frequencies to go to all speakers.
On MTX amplifiers, you can select which type of crossover you want to use based on the kind of speakers you are powering with the amplifier. For example, when using smaller speakers such as a 4”, it would be a good idea to use the HP or HPF crossover to protect them from the lower frequencies they are not intended to reproduce. Using the HP crossover setting also focuses the amplifier power on the frequency band that your speakers are suited for. For example, if you are using full range coaxial speakers with a subwoofer, there is no need to send low frequencies to your coaxials since your subwoofer will already be playing those frequencies and vice versa.
You might notice that on the THUNDER75.4 amplifier, the front channels are factory set to High Pass Frequencies. This is because front channels are typically always used for speakers.
The rear channels have a selectable filter setting for LPF, HPF, or FR. This allows you to use the rear channels for speakers, tweeters, full-range coaxials, or even subwoofers. If you were to bridge the two rear channels together to power a subwoofer enclosure, you would select the LPF crossover option.
HPF and LPF FILTERS or FREQ ADJUSTMENTS
Once you have all your crossovers set to the appropriate frequency range, you can dial them in further using filters. The purpose filters is to send the music frequencies only to the speakers that can reproduce them. Sending all frequencies to all speakers causes your amplifier to work harder and causes your speakers to try to play frequencies they aren’t intended to play. Incorrectly setting your crossovers and filters can create distortion and could cause damage to your speakers, subwoofers, and or amplifier.
Properly tuned filters can also allow your audio system to create more “headroom” allowing it to achieve higher SPL levels without distortion and/or damage to equipment. “Headroom” refers to available power output capability of the amplifier. If your amp is working at its maximum potential all the time, there is no “headroom” left. By using filters to send the appropriate amounts of power to the appropriate speakers, your system will not be sending unnecessary power anywhere, keeping it available (“headroom”) for heavy bass notes and peak audio signals when needed.
Setting your LP or LPF filter on your subwoofer amp is also an easy process. To set your filters, you should refer to the frequency response specifications of the speakers or subwoofers you are powering with each channel of the amplifier. The first step is to set the dial on the amplifier in the middle of its range. Then listen to your system with music you are familiar with (music with heavy bass is useful for this setting). While listening, make sure the transition from your speakers (high frequencies) to your subwoofer(s) (low frequencies) is smooth. Using a Frequency sweep from 200Hz to 20Hz will allow you to hear how seamless the transition is between your full range speakers and subwoofer(s).
If your LP filter is set too high, you may notice the woofer is playing very loud, but does not seem to have the bass or impact that you are looking for. This is because the woofer is playing at the higher frequencies that your speakers are supposed to be reproducing. This can cause distortion and or sound cancellation, both of which are not good for achieving the best sound quality possible.
To set LPF filters on your subwoofer amp, an easy way is to disconnect the RCA’s to any amplifiers that are not powering your subs. Be sure that all equalizer settings (bass, treble, front/rear, etc) in your head unit or at “0” or flat. We don’t want any head unit settings affecting the sound we are trying to tune with the amplifier adjustments. If you have more than one amp powering your subs, set them one at a time. With only one amp receiving signal from your head unit, play your favorite type of music at about 75% volume with the LPF filter on your amp set as high as it will go. Slowly turn the dial from high to low until you stop hearing all the high frequencies through your subwoofers. Vocals, guitars, cymbals and other high frequency type audio should not play through your subwoofers.
Once your LPF filters are set, you can move on to your HPF filters. Once again, disconnect the RCA’s from any amplifiers, or amplifier channels, that are not being set at the moment. This helps to isolate the speakers you want to hear. Play your favorite music at about 75% volume and adjust your HPF filter from low to high until you remove the lower frequencies such as bass drums.
When you think your LPF and HPF filters are set, plug all RCA cables back into your amplifier(s) and tweak again. At this point, both filters should only need small adjustments until all transitions between frequency ranges sound clean and precise.
When playing music, be sure you are using a source that will provide a good audio signal. For example, using an iPod or smartphone with compressed music files is not a good audio signal. For more information about finding good music, refer to the “Choose high quality recordings” section of the article found HERE.
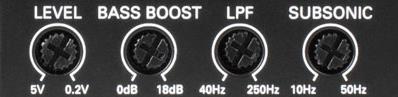
BASS BOOST, is a commonly misunderstood and misused feature. Everybody wants more bass and bass boost gives you more… So turn it all the way up, right? NO!
With your favorite music playing at about 75% and your head unit settings still flat with no bass, treble, or any other settings in place, you can carefully turn the bass boost up to hear what the bass sounds like. Just a little boost will provide more kick in your bass notes but this is often where distortion starts. If you hear distortion after adding bass boost, you have two options. Either leave your bass boost on and turn your gain down until the distortion goes away OR turn your bass boost back down. You can play with this setting by turning the bass boost up until distortion and then turning the gain back down until the distortion goes away. Find a happy medium and fine tune your bass using the LPF filter. Find the setting that sounds best to you and with your music. Adding boost reduces headroom and too much boost will drastically reduce your amplifier’s efficiency. For every 3dB of bass boost it takes 2x the power. So if you have a 500-watt RMS amp, and you have your Bass Boost set at 6dB, when the amp is running at a low level (let’s say 100wRMS for low level listening) it will be actually be working to provide around 400WRMS at the boost frequencies. As soon as you would turn up your system your 500-watt RMS amp will run out of power and start clipping. Clipped signals are bad for sound quality and bad for your subwoofers and speakers as mentioned earlier in this article.
Whatever you do, don’t turn your bass boost up without adjusting your gain. Bass boost can be very damaging to your subwoofers if not used properly.
SUBSONIC FILTER – is basically a HPF (high pass frequency) filter for your subwoofers. As we discussed earlier in this article, subwoofer amps typically use LPF (low pass frequency) filters to block high frequencies that should be playing through your speakers. A subsonic filter will attenuate frequencies so low that your subwoofer cannot reproduce them OR that humans are incapable of hearing.
Subsonic filter is also a very important feature for vented enclosures. For example, if your custom built, ported enclosure is tuned to 33Hz, you probably don’t want to play frequencies that are way lower than that. Doing so could damage your subwoofers.
Humans can generally hear from 20Hz to 20,000Hz. If you send low frequencies below 20Hz to your subwoofers, you can’t hear them anyway. Most music doesn’t contain these frequencies for that very reason but even 25Hz can be hard on your subwoofer if it isn’t designed to play that low.
There are many opinions about where to set a subsonic filter. 5Hz below what the box is tuned for… ½ an octave below what the box is tuned for… We recommend simply turning your system up to a maximum volume and playing a song that you have that hits the lowest frequency. Or find a test tone disc that has a variety of low frequency tracks and adjust your subsonic filter until your subs play as low as possible without bottoming out. Keep an eye on your subs and listen. Find a setting that sounds good to you and your subwoofers don’t appear to stop moving at either end of their excursion.
REMOTE BASS CONTROL / EXTERNAL BASS CONTROL – is a feature on some amplifiers that allows you to fine tune your amp’s gain on the fly. Typically found on amps that can be used with subwoofers, this is a great feature to have for people who listen to different types of music. If you’re listening to rap and want a lot of bass but then switch to country where you don’t want quite as much low end, having the ability to control the amount of bass in your music from a remote bass control knob is a great option. For more information about remote or external bass controls, CLICK HERE.
MORE AMPLIFIER FEATURES
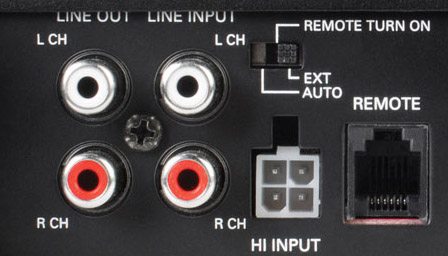
HI LEVEL / LO LEVEL INPUTS, on an amplifier are jacks to plug the audio signal wires from your head unit into your amplifier. Low or line level inputs accept your typical RCA cables running from the head unit to the amplifier. Hi level inputs are a feature on most MTX amplifiers that allows the installer to tap into factory wiring to get the audio signal. Simply wire the signal from any factory speaker termination, such as you might find at the rear speakers, into the included hi level input plug and avoid running RCA’s the length of the vehicle. Hi level inputs are great when using the factory head unit and can save money on expensive integration components you might otherwise need.
OUTPUT, connections on an amplifier allow you to relay the audio signal to additional amplifiers in your system quickly, easily, and at less expense. Without a line out feature, each amplifier would require an additional RCA cable, possibly running the length of the vehicle, from the amp to the head unit. With a line out feature, the installer can simply plug an RCA cable into the output of the amplifier that is already connected to signal and into the additional amplifier. This feature can save you time and money on installation and uses shorter RCA cables.
So now you can feel assured you know how to properly adjust a car audio amplifier to get the very best performance from it and your entire system. Your music will sound its best at any volume.