Cookies help us deliver our services. By using our services, you agree to our use of cookies.
Learn more
X
Car Subwoofer Enclosure Construction
Building a quality enclosure is critical to getting the best response out of a woofer. Quality construction begins with a quality design. The volume of air contained within the enclosure is a specific amount. The enclosure must not flex. The enclosure must not leak air. The enclosure must not rattle or vibrate.
Materials
The enclosure walls should be constructed of a high strength material that will not leak air. The most common materials are Medium Density Fiberboard (MDF) and High density particle board. For enclosure volumes less than half a cubic foot, 1/2” to 5/8” material is the minimum. On Enclosures greater than half a cubic foot 5/8 or 3/4” is recommended. Thicker is better, in that it is more rigid. A rigid wall is crucial. When a woofer moves out, the air within the enclosure is rarefied (thinned). If the walls are not of sufficient strength the walls will bend inward, which in turn causes a cancellation of the front wave.
If any wall of the enclosure spans more than 18” it is recommended that the enclosure be braced. This can be accomplished by attaching a 1”x2” piece of wood to the opposite walls of the enclosure. Remember to account for the volume of air that this brace takes up.
Walls should be attached with glue and either screws, nails or staples. Most of the strength of the enclosure comes from the glue, so be sure to use a good wood glue. When using screws, be sure to pre-drill the holes, or the wood will split.
It is a good practice to use cleats in enclosures. A cleat is a strip of wood glued along the inside edges of the enclosure. This technique adds strength to the enclosure.
Before mounting the driver to the enclosure, use a bead of silicone sealant (not bathtub caulk) around the inside edges of the enclosure. This will remove any chance for air leaks.
Volume Calculations
The ability to accurately determine the enclosure volume is critical to building a quality subwoofer system. Most of the time the enclosures you will build will be standard shapes, like those shown below. Should you find the need to build a more complex enclosure, do not be alarmed, just break down the enclosure into its component parts, calculate the volumes, then add the volumes together to get the total volume. Remember to allow for the thickness of the wood when calculating volume. Use the following formulas (using inches) to find the volume of an enclosure (in Cubic inches). Then to convert this to cubic feet, divide by 1728.
Rectangle: Height X Width X Depth

Triangle: .5 X Height X Width X Depth

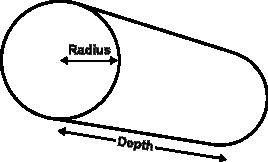
Cylinder: 3.14 X Radius X Radius X Depth
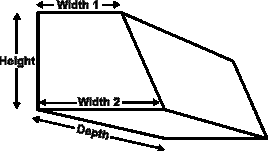
Wedge: (W1+W2)/2 X Height X Depth
Golden Ratio
Once you have determined the proper volume for your enclosure, the “Golden Ratio” is a simple way to calculate enclosure dimensions that minimize panel resonances.
Begin by finding the volume of the enclosure in cubic inches. If your volume is in cubic feet, simply multiply that number by 1728. Next, find the cube root of this number (you will need a scientific calculator for this). This is your first panel dimension. Then take the first dimension divided by 1.62, This is your second dimension. For the third dimension, multiply the first panel dimension by 1.62.
Golden Ratio Subwoofer Enclosure Size Example
Volume = 1.75 Ft3
1.75 * 1728 = 3024 in3
cube root of 3024 = 14.46” (1st Dimension)
14.46 / 1.62 = 8.93” (2nd Dimension)
14.46 * 1.62 = 23.43” (3rd Dimension)
Remember that these are internal dimensions, so you will need to add for the thickness of the wood. Assuming 3/4” wood, this enclosure would be 15.96 X 10.43 X 24.93.
Damping
If a sealed enclosure is too large to fit in a given area of a vehicle, it is possible to decrease the necessary box volume by about 20%. This is possible by “Stuffing” the enclosure with 1.5 pounds per cubic feet of a low density, high specific heat material (fiberglass, Dacron, long fiber wool). Be sure to keep the stuffing away from the basket and pole piece vent of the speaker. This may be accomplished with a brace placed behind the speaker.
Another reason to “stuff” a sealed enclosure is to smooth out a bump in the frequency response. By varying the amount of fill in the enclosure you will be adjusting the bump as well as the F3 of the system.
In vented enclosures, stuffing the enclosure is not recommended. However, you may find that by lining 3 opposite walls of the enclosure with a layer of fiberglass, some noises that are produced in the voice coil area, will not be allowed to be heard through the vent opening. Care should be taken so that there is no possibility of the fiberglass interfering with the vent. Lining the enclosure in this manner will also help the upper frequency response of the speaker.
Vent Calculation
For a vented enclosure to operate properly, the port diameter and length must be tuned for the enclosure volume and the speaker that it contains. A good rule of thumb for determining the minimum diameter of the port is 2” for 8” speakers, 3” for 10” speakers and 4” for 12” and larger speakers. These are minimums, if you can use a larger diameter port, do so. Larger diameter ports are less likely to cause port noises. A good idea, especially with smaller diameter ports, is to round over the openings of the ports, both inside the enclosure and out. This will reduce the turbulence of the air rushing over a sharp edge.
To calculate the vent length for a given Diameter (D), Box Volume (Vb), and Tuning (Fb), use the following formula:
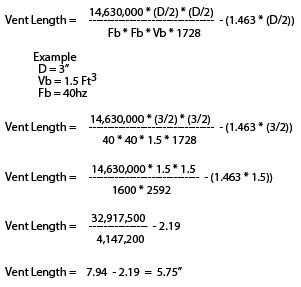
The appendix contains tables that give port lengths for commonly used diameters, volumes and tunings. The above formula can be used for non standard sizes.
Vent Placement
A vent can be thought of as a pressure valve for the enclosure. When the input frequency is at or near the vent tuning frequency, this “valve” opens up to equalize the air pressure. With this concept in mind, it would make sense that placing the vent opening too close to a wall or the speaker itself will change the way the “valve” operates.
Whenever possible, the vent should allow this pressure to go into the listening area of the vehicle. Vent placement is not that critical, however a good rule of thumb is to keep the vent openings at least the diameter of the vent away from any wall, and two times the diameter away from the speaker cone itself.
Long Vents
When designing enclosures, occasionally we come across a vent that will not fit into the enclosure without having the openings too close to a wall. When this occurs, we have three options; use a smaller diameter vent, allow the vent to stick out of the enclosure, or bend the vent inside the enclosure.
If we are already using the smallest vent diameter possible, and letting the vent stick out of the enclosure is not possible with the install, the remaining option will allow us to build the enclosure, however with some more design time and a more difficult enclosure to build.
When using PVC pipe as your vent material, you may simply use an elbow to allow the vent to wrap around the enclosure. When determining the length of a vent with an elbow, measure the length through the center of the pipe. Rectangular vents allow us some more options, in that the vent walls can also be the walls of the enclosure itself. Again, to find the length of a folded vent, measure the length through the center of the vent opening.
Subwoofer Long Vent Example
Desired:
- An enclosure with the dimensions of 18” x 16” x 10”.
- A 6” diameter vent 15” long.
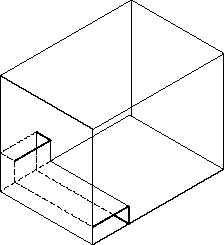
To accomplish our goal of integrating the vent into the enclosure, start by finding a rectangular equivalent for a 6” vent (see appendix). For this example, 3.76” x 7.52” has been selected. By placing the vent opening on the same panel as the speaker, and using the bottom and side walls of the enclosure to form part of our vent, we can then build the enclosure as shown in diagram 1.
Diagram 1 - Integrated vent
Vent applications
When a subwoofer system has a vent, it is critical to allow the sound produced by the vent to enter into the listening area without restriction. While this may be accomplished by running the vent through the rear deck, this is not the most cosmetically appealing method.
If we were to place a grill over the vent, the tuning of the vent would change, as well as hearing the grill material vibrate at high volumes. To circumvent this problem, we need to slow the air flow through the grill by maximizing the area of the grill.
The grill surface should be at least three times the surface area of the port. This decrease in airspeed should lessen any noises from the grill.
If we were to take this a step farther and build an enclosure that couples the airflow from the port directly through the grill, all of the sound generated by the port will enter the listening area. This is the preferred method.
Though it is typically used in sedans, it works equally well in hatchbacks and when mounting subwoofer systems in the bed of a pick-up truck.
When constructing a diffuser there are a few concepts to keep in mind; The height of the diffuser should be at least the diameter of the vent, The diffuser should make an air tight seal between the enclosure and the rear deck, The area of the diffuser should be at least three times the area of the vent, but use larger whenever possible.
When covering a large span with grill cloth, use hardware cloth or other screening material below the grill for added strength.